Home Pricing About Us Contact

Ghost Mannequin Photography: The Complete 2026 Guide (Shoot, Edit, and Cost)

TL;DR — Key Takeaways

  • Ghost mannequin photography combines a garment shot on a mannequin with a separate interior shot, then digitally removes the mannequin so the clothing looks “worn but bodiless.”
  • Three joint variations cover almost every garment: neck joint (tops), sleeve joint (jackets), and bottom joint (open-hem dresses).
  • Studio gear list: removable-panel mannequin, 50–85mm lens, tripod, two softboxes at 45°, and a seamless white backdrop.
  • 2026 pricing: outsourced manual editing runs $0.79 – $5.00 per image, full shoot-and-edit packages sit at $25 – $120 per image, and AI ghost mannequin tools start near $0.19 per image.
  • Marketplace nuance: Amazon requires adult-apparel main images on a live model; ghost mannequin composites are the accepted format for secondary product-only views on every major platform.

Who This Guide Is For

Whether you shoot your own catalog or outsource, this guide gives you the full playbook without the fluff. It serves:

  • Fashion and apparel brands launching seasonal drops that need consistent, catalog-scale product imagery.
  • Amazon, Shopify, Etsy, Walmart, and TikTok Shop sellers who want listings that pass compliance and convert on the first scroll.
  • Studio photographers and post-production teams aiming to sharpen an in-house ghost mannequin workflow.
  • In-house marketing and merchandising teams weighing DIY, freelance, AI, or full-service editing partners.

By the end you will know exactly what to buy, how to shoot, how to edit, which marketplace rules apply, and where the smart money spends in 2026.

Prefer to skip the studio setup? Photofixal’s ghost mannequin service delivers marketplace-ready apparel visuals from just $0.79 per image.


What Is Ghost Mannequin Photography?

Ghost mannequin photography is a fashion apparel technique that photographs a garment on a mannequin, captures a separate interior shot of hidden areas (collar, cuffs, hem), and then digitally combines the two so the mannequin disappears while the interior detail remains. The finished image shows the clothing keeping its shape, drape, and inner construction — as if worn by an invisible figure.

The technique is also known as invisible mannequin, neck joint photography, hollow-man photography, or the 3D mannequin effect. Every term refers to the same composite output.

Ghost mannequin sits between flat lay (cheap and fast, but shape-blind) and on-model (rich, expensive, and slow per SKU). It gives shoppers a “worn” sense of fit while staying scalable enough for catalogs shipping thousands of SKUs a season.


Why Fashion Brands Rely on Ghost Mannequin Photography

Ghost mannequin exists because product photos on hangers or flat surfaces do not sell structured garments. When a jacket lies flat, the shoulder shape disappears. When a shirt hangs, the collar collapses. Shoppers hesitate, question the fit, and click away.

The technique delivers three commercial advantages:

  • Higher perceived fit accuracy — 3D silhouettes communicate cut and drape in a way flat lay cannot, which reduces returns driven by “the shape wasn’t what I expected.”
  • Catalog consistency at scale — the same mannequin body, camera height, and lighting across every SKU produces a coherent brand grid.
  • Marketplace compliance for secondary images — Amazon’s apparel imaging guidelines prohibit visible mannequins in every product image, but composites where the mannequin is fully erased are the accepted off-figure format.

For a broader view of how ghost mannequin fits into the wider product photo editing stack, brands typically pair it with clipping path, color correction, and shadow creation as a bundle.

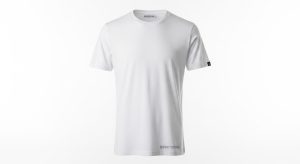
Fashion apparel product listing example ghost mannequin

The Ghost Mannequin Decision Framework

Before you buy a mannequin or hire an editor, answer three questions. The answers determine whether ghost mannequin is even the right format for your catalog.

  1. Is the garment structured? Blazers, jackets, dresses with defined silhouettes, denim, and tailored shirts benefit most. Loose, drapey knits and basic tees benefit less.
  2. Is the average price point above $40? Higher-priced apparel earns the cost premium of a proper ghost mannequin. For sub-$20 basics, flat lay usually pays back faster.
  3. Do you ship enough SKUs to make in-house shoots repeatable? Below 30 SKUs per drop, outsourcing shoot + edit is usually cheaper than buying gear. Above 200 SKUs, in-house capture with outsourced editing wins.

If two of three answers are “yes,” ghost mannequin is the right format. If not, flat lay for volume plus a small on-model hero shoot delivers stronger ROI.


Ghost Mannequin vs Flat Lay vs On-Model: Which Format Wins?

Every apparel brand hits this fork. Here is the honest comparison:

ApproachCost per imageBest forWeakness
Flat lay$5 – $20Accessories, unstructured knits, social feedsKills structured silhouettes; no sense of fit
Ghost mannequin$25 – $120 full package • $0.79 – $5 edit-onlyStructured tops, jackets, dresses, catalog scaleStudio setup required; no live-model appeal
On-model$60 – $300+Hero images, editorial, fit storytellingSlow per SKU; costs multiply with model day rates
AI ghost mannequin$0.19 – $1High-volume basics, drafts, test listingsStruggles with technical drape and precise interior detail

Most fashion brands run a hybrid stack — on-model for hero shots, ghost mannequin for product detail pages, flat lay for accessories, AI for prototype listings.


Ghost Mannequin Studio Equipment Checklist

A production-ready studio needs seven pieces. Skip any and the editing time doubles.

  • Ghost mannequin form — matte white with removable panels for neck, chest, arms, and hips. Magnetic-fit models (from brands like Mohr Models or Subastral) are the professional standard because they allow interior capture without disassembling the whole form.
  • Camera and tripod — a DSLR or mirrorless body locked on a sturdy tripod. A quick primer on current mirrorless cameras helps pick a stable body for repeat catalog work.
  • Lens: 50mm or 85mm prime — avoids the barrel distortion of wide-angle lenses. A 24–70mm zoom works if you stay above 50mm.
  • Two softboxes — placed at 45° angles from the mannequin, matched in power output.
  • Seamless white background paper or vinyl — extending under the mannequin so the floor and wall meet as one continuous surface.
  • Prep tools — garment steamer, lint roller, pattern pins, small clips, tissue paper, foam board, and double-sided tape for shaping.
  • Grey card or color checker — the fastest route to a locked white balance across the whole session.

Mark the floor with tape at the tripod, key light, and mannequin positions. Consistent placement across every SKU is what makes a catalog feel like one shop rather than a hundred disconnected shots.

Ghost mannequin photography studio lighting setup

How to Light a Ghost Mannequin Shoot

Lighting decides whether editing takes ten minutes or two hours per garment. The industry-standard three-point setup:

  • Key light — softbox at 45° camera left, slightly elevated above the mannequin’s chest line.
  • Fill light — softbox at 45° camera right, matched to the key in power so shadows stay soft on the opposite side of the garment.
  • Background light — aimed at the backdrop, dialed 1 to 1.5 stops brighter than the subject so the white blows to pure white in-camera. This single setting saves hours of masking work later.

Add a fourth overhead light for garments with heavy texture, deep folds, or dark fabrics that swallow light. Use fill cards or reflectors on either side to soften side shadows on collars and cuffs.

Consistent white balance is non-negotiable. A short primer on white balance explains how a grey card plus a fixed Kelvin value keeps every SKU in a shoot color-matched — critical when forty shirts must all look like the same shop.


Camera Settings for Ghost Mannequin Photography

Manual mode is the only mode. Auto exposure will shift between SKUs and force color-matching in post.

  • Aperture: f/8 to f/11 — the sharpness sweet spot on most lenses; deep enough to keep the full garment in focus.
  • ISO: 100 to 200 — cleanest possible files. Higher ISO introduces noise into shadow areas of dark fabrics.
  • Shutter speed: locked to strobe sync speed (typically 1/125 to 1/200).
  • White balance: fixed Kelvin value, not Auto. Set once with a grey card and never touch it.
  • Camera height: chest level for tops, hip level for bottoms. Shooting from higher tapers the garment and misrepresents fit.
  • Focus: manual, locked on the garment placket or center-front seam.

Set these once and do not touch them for the rest of the session. Every unchanged setting is one fewer variable to fix in editing.


The Four-Shot Ghost Mannequin Capture Method

A complete ghost mannequin capture uses exactly four shots per garment. We call this The Four-Shot Capture Method because skipping any single one leaves an unfillable hole in the composite:

  1. Front exterior — the garment fully styled on the mannequin, straight-on.
  2. Back exterior — rotate the mannequin (not the camera) and capture the back at identical settings.
  3. Interior shot — the inner collar, back neck, or lining laid flat or over foam board. This shot fills the neck hole once the mannequin is gone.
  4. Detail shots — cuffs, hems, prints, hardware, buttons; and for hoodies, the hood interior.

For jackets and blazers, add sleeve interior shots. For open-hem dresses, add hem lining shots. Complex outerwear can require six or seven captures per garment — plan the extra time in the shoot schedule.


Garment Prep Before The Shoot

Every wrinkle you skip becomes retouching time. Deep creases distort the garment silhouette and are difficult to fix without warping the shape itself, which is why professional studios treat prep as a shoot-day discipline.

The prep checklist:

  • Steam or iron every garment before it goes on the mannequin.
  • Lint-roll the whole surface — cameras see fibers the eye misses.
  • Secure all closures — buttons, zippers, snaps, and ties.
  • Pin the back to hold shape without visible pins from the front.
  • Fill hollow sleeves and torsos with tissue paper for structure.
  • Tape cuffs and hems to sit symmetrically.
  • Check symmetry — align collars, lapels, and sleeve lengths before every shot.

Prep takes five to ten minutes per garment. It saves twenty in post. If wrinkles slip through, a dedicated pass to remove wrinkles with frequency separation solves crease patterns without smearing the fabric weave.


Step-by-Step Photoshop Editing Workflow

This ten-step composite workflow is the same one production studios use worldwide. The values in parentheses are the exact settings professional editors use — not guidelines, but real production numbers.

Step 1 — Open your source shots as layers in a single Photoshop file. Include front, back, interior, and any sleeve or hem interior captures.

Step 2 — Auto-align layers. Select all layers, then run Edit → Auto-Align Layers → Auto. Even a small tripod shift between shots gets corrected here.

Step 3 — Trace the garment with the Pen Tool (P). Zoom to 300–400% and place anchor points every 8–12 pixels along the garment edge. Convert the path to a selection with feather 0.5–1 px for a natural transition. To speed up complex tracing, our guide to Photoshop tools covers pen-tool shortcuts and pressure-curve technique.

Step 4 — Mask the mannequin out. Add a layer mask from the selection. The mannequin edges around the collar, sleeves, and hem should now be transparent.

Step 5 — Place the interior shot behind the garment layer. Drop its opacity to about 50% so you can see through it while aligning. Position the collar interior directly under the neck opening.

Step 6 — Warp the interior to match the collar curve. Use Edit → Transform → Warp and pull the corners to follow the natural curve of the neckline. Restore full opacity when the fit looks right.

Step 7 — Mask the interior layer so only the parts visible through the neck hole show. Refine the mask edges with a soft brush at 30% flow, 15% opacity for a natural fabric-to-fabric transition.

Step 8 — Add subtle interior shadow. Create a new layer between the garment and interior, set to Multiply blend mode at 12–18% opacity. Paint a soft shadow along the inside neckline. This detail is the single most common differentiator between amateur and professional ghost mannequin work.

Step 9 — Restore the brand label from the interior shot. Labels anchor the image as a real garment rather than a Photoshop cutout.

Step 10 — Final cleanup. Use the Healing Brush to remove lint, threads, and pin dents. Flip the canvas horizontally (Image → Image Rotation → Flip Canvas Horizontal) to spot asymmetry your eye no longer catches. Match interior exposure to exterior with Curves. Crop to platform aspect ratio. Export as sRGB JPEG for web.

Neck joint ghost mannequin photoshop editing example

Editing collars, sleeves, and hemlines burns an hour per garment. Photofixal’s image masking service handles every strand and stitch in a fraction of the time.


The Three Joint Variations Every Editor Should Know

Every ghost mannequin composite falls into one of three joint patterns. Studios that price by joint type usually charge more for multi-joint garments because each joint adds a distinct interior capture and mask.

  • Neck joint — rebuilds the inside of the neckline. Used on tees, shirts, sweaters, hoodies, and knitwear. The composite fills the neck hole with the inner collar and brand label.
  • Sleeve joint — reconstructs the inside of open sleeves. Essential for jackets, blazers, cardigans, and coats where the inner cuff or lining shows through.
  • Bottom joint — recreates the interior of an open hemline. Required for drop-hem dresses, open-bottom tunics, and any garment where the hem lining is visible.

A lined coat with wide cuffs and an open hem can combine all three joints in a single composite. Budget the extra editing time upfront.


Ghost Mannequin Techniques for Specific Garment Types

Different garments demand different approaches. This section captures the long-tail nuances that generic guides miss.

  • T-shirts and basic tops — the simplest neck joint. One interior collar shot is enough. Watch for shoulder puckering where the mannequin edge meets fabric.
  • Hoodies and sweatshirts — capture the hood interior separately with the hood laid flat. The composite drops it behind the neckline plus a small shadow under the hood opening.
  • Button-down shirts — pin the button placket flat before shooting; misalignment reads as sloppy tailoring. Style collars symmetrically and match cuff angles.
  • Blazers and jackets — require both neck and sleeve joints. Fill the sleeves with tissue paper so the cuffs sit open naturally rather than collapsed.
  • Dresses — long, structured pieces need a bottom joint if the hem is open. For flowing dresses, style the drape symmetrically and pin the back panel to remove sag.
  • Activewear and technical fabrics — reflective and stretch fabrics show every wrinkle. Steam extensively and shoot with slightly softer key lighting to reduce hot spots.
  • Sweaters and knitwear — bulky knits crush the mannequin shape. Use pins on the back to hold shoulder points, and avoid over-stretching the fabric.
  • Kidswear — smaller mannequins with proportional dimensions; interior shots often skipped for basics because collars are simple.

Common Ghost Mannequin Mistakes and How to Fix Them

Every studio hits these errors. Each has a specific fix.

  • Deep wrinkles left in-camera — inflates retouching time and can distort the silhouette. Fix: steam every garment thoroughly; pin hidden points behind the shoulders to hold shape.
  • Missing interior shot — leaves an unfillable hole in the composite. Fix: never leave the shoot without capturing the inside of every opening the mannequin covered.
  • Asymmetric shoulders or sleeves — makes the garment read as “off.” Fix: use a symmetrical mannequin, mark shoulder points with tape, flip the canvas horizontally in post to catch mismatched sides.
  • Inconsistent camera height between SKUs — some pieces look elongated, others compressed. Fix: mark the tripod height on the leg with tape and never adjust mid-session.
  • Wide-angle lens distortion — barrel-shapes the garment. Fix: stay at 50mm or above; skip anything below 35mm.
  • Uneven backdrop lighting — leaves grey patches requiring heavy masking. Fix: raise the background light 1–1.5 stops above the subject so the white blows to pure white in-camera.
  • Over-smoothing in post — kills natural drape and folds. Fix: retouch only distracting creases; keep the fabric’s real texture.
  • Interior exposure mismatch — the neck opening reads “pasted in.” Fix: shoot the interior under identical lighting; match with a Curves adjustment during compositing.
  • Skipped label restoration — shoppers subconsciously spot missing branding. Fix: always bring the brand label back into the composite.

What Ghost Mannequin Editing Cannot Fix

Ghost mannequin post-production is powerful, but not magic. Understanding its limits saves time, money, and unrealistic expectations before you brief an editor.

  • Structural fit problems — if the garment is styled two sizes too big on the mannequin, no amount of editing rebuilds a flattering shape.
  • Deep, permanent creases — creases pressed into fabric during shipping or storage need physical prep, not post-production.
  • Bad color accuracy at capture — if the original file has a strong color cast from mixed lighting, matching brand color requires shooting again.
  • Missing interior captures — no editor can invent a collar lining that was not photographed.
  • Motion blur or soft focus — sharpness cannot be recovered from an out-of-focus source file.
  • Cheap fabric that looks cheap on camera — post-production polishes; it does not upgrade material.

The right time to fix these is at the shoot, not on the editor’s screen.


Ghost Mannequin Photography Cost in 2026

Cost depends on whether you buy shoot-plus-edit as a package, edit-only for photos you already have, or replace the workflow with AI.

Verified 2026 rates:

  • Manual outsourced editing (edit-only): $0.79 – $5.00 per image based on garment complexity and joint count.
  • Legacy premium studios (edit-only): $3 – $8 per image.
  • Full shoot + edit package (photography studios): $25 – $120 per image, or $55 – $75 for a three-photo garment set.
  • True all-in cost per SKU (shoot + edit + QC combined): $15 – $50.
  • AI ghost mannequin tools: $0.19 – $1 per image, with unlimited-run subscription options.
  • Volume discounts: 10% off at 50+ images, 20% at 100+, 30% at 500+, and 40% at 1,000+.

Simple math for a 200-SKU seasonal drop at $2/image edit-only: $400 for a full season of ghost mannequin work — cheaper than a single professional on-model shoot day and applicable to the entire catalog.

Launching every colorway from one shoot? Photofixal’s color change service generates unlimited SKU variants without a single reshoot.


AI Ghost Mannequin vs Manual Editing: The 2026 Decision Framework

AI has genuinely arrived in this niche. Tools like Photoroom’s Ghost Mannequin, WearView, Botika, Claid, Apiway, Photta, and FASHN Packshot produce usable composites in seconds. But AI still misses on the hard cases.

When AI wins:

  • High-volume single-joint garments (basic tees, simple polos).
  • Draft or placeholder listings for testing catalog structure.
  • Speed-critical launches where images ship the same day.

When manual editing wins:

  • Structured pieces where drape and silhouette are the selling point (blazers, coats, tailoring).
  • Interior detail that must match the actual garment (branded linings, specialty stitching).
  • Premium price tiers where a plastic AI edge kills perceived value.
  • Marketplace hero images where compliance and consistency matter.

The winning studios in 2026 use both. AI drafts, humans polish. Volume runs the AI pipeline; hero images get the manual composite. If you look closer at AI vs manual approaches across background removal and cutout workflows, the same hybrid pattern shows up.


The 72 DPI Myth for Web Product Images

Every ghost mannequin guide repeats it: “Export at 72 DPI for web.” That instruction is not wrong — but it is meaningless. Pixels per inch (PPI) has no effect on how an image displays on a screen. Web browsers care about pixel dimensions, not the PPI metadata embedded in the file.

The practical takeaways:

  • For web display, only pixel dimensions matter (for example, 2,000 × 2,000 px for Amazon zoom).
  • The PPI field can be 72, 300, or 600 — it will not change how the image renders in a browser.
  • PPI only matters for print output, where 300 PPI at the physical print size delivers professional-quality reproduction.
  • Ignore the DPI field entirely when exporting for web; focus on pixel width, height, file size, and color profile (sRGB).

Owning this correction earns real trust from photographers and studios who have been repeating the 72 DPI rule for a decade without questioning it.


Marketplace Compliance for Ghost Mannequin Images

Every platform enforces slightly different rules. Miss one and listings vanish from search or get suppressed.

Amazon apparel rules

Amazon’s image guidelines for clothing require:

  • Main images must be photographed on a live model for adult apparel; visible mannequins are prohibited except for stockings and socks.
  • Ghost mannequin composites (mannequin fully erased) are the accepted off-figure format for secondary product-only images.
  • Pure white background (RGB 255,255,255) with product filling 85%+ of the frame.
  • Minimum 500 px on longest side; preferred 1,600+ px so zoom activates.
  • Up to 9 total images per listing.

Most brands miss the model-only main-image rule for adult apparel and get suppressed. Read the fine print before shipping listings.

Shopify, Etsy, Walmart, and TikTok Shop

  • Shopify — 2,048 × 2,048 px square product images; WebP where the theme supports it.
  • Etsy — listing photos of at least 2,000 pixels on the shortest side, in JPG, PNG, GIF, or HEIC.
  • Walmart Marketplace — 2,000 × 2,000 px recommended, four or more images per listing, seamless white background.
  • TikTok Shop — JPG/PNG under 5 MB, minimum 600 × 600 px, five or more images per product.

Google’s WebP compression study confirms WebP files run 25–34% smaller than JPEG at equivalent quality, which directly improves Core Web Vitals on product detail pages.


How to Brief an Outsourced Ghost Mannequin Editor

The single biggest reason outsourced editing “doesn’t work” is a bad brief. Fix the brief and quality problems evaporate.

A complete ghost mannequin brief includes:

  • Reference images — two or three “gold standard” edits that represent the ideal output.
  • Style rules — background hex (usually #FFFFFF), shadow style, cropping ratio, negative-space margin around the garment.
  • File naming convention — for example, SKU12345_front.jpg, SKU12345_back.jpg, SKU12345_interior.jpg.
  • Export specs — exact dimensions, file format, color profile (sRGB for web), and maximum file size per destination.
  • Joint type expected — neck, sleeve, bottom, or combination.
  • Do-not-touch list — every product feature that must remain unchanged (specific labels, hardware, print positions).
  • Turnaround SLA — hours from delivery to first draft, and the revision policy.

Clear briefs cut revision rounds by more than half. Studios that receive one-line requests deliver one-line-quality output; studios that receive documented briefs deliver work you can ship without checking.


Scaling Ghost Mannequin Production

A single garment is craft. A thousand-SKU catalog is operations. Three habits separate scaled studios from struggling ones:

  • Build a written style guide covering camera height, lighting distance, mannequin position, shot list, background hex value, cropping ratio, and export presets. New shoots then match old ones without conversation.
  • Batch by garment type. Shoot all tees together, all blazers together, all dresses together. Setup changes between garment types waste more time than the shoots themselves.
  • Standardize file naming and delivery. Editors receive predictable file bundles; QC catches missing shots instantly.

For studios above 500 images per month, outsourcing the editing while keeping the shoot in-house is the standard high-margin operation. Post-production runs 24-hour turnaround; photographers focus on capture rather than compositing.


Post-Production Extras That Lift Perceived Value

Three finishing touches distinguish premium ghost mannequin images from generic ones:

  • Realistic shadow beneath the garment. A soft, natural drop shadow anchors the piece on the surface. Our tutorial on realistic shadows covers the exact opacity and blur values professional editors use.
  • Consistent color grading. Every garment in a shoot should share the same tonal fingerprint. A short primer on color grading covers the LUT and Curves techniques for catalog consistency.
  • Symmetry pass. Flip the canvas horizontally as the final QC step. Every asymmetric collar, sleeve, or hem you missed will jump out immediately.
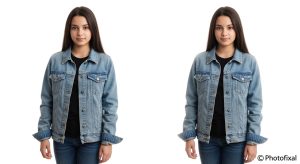
Neck joint apparel editing before and after

Real Example: A 40-SKU Denim Jacket Launch

A Shopify seller launches a 40-SKU denim jacket collection. The workflow:

  1. Prep day: steam all 40 jackets, lint-roll each, pre-position tissue paper for shape.
  2. Shoot day: 10 minutes per garment on average — four shots each (front, back, interior collar, interior sleeve). Total: ~7 hours.
  3. Post-production: editors receive files with standardized naming. Manual compositing runs ~30 minutes per garment for four shots. Total: ~20 hours edit time.
  4. QC: flip-canvas symmetry check, color-grade consistency, marketplace export presets.
  5. Delivery: 160 finished images (four per SKU) ready for Shopify, Amazon, and Etsy variants.

Total shoot-and-edit budget at $2/image outsourced: $320 for 160 catalog-ready images. On-model equivalent would cost $10,000+ for the same coverage.


FAQ — People Also Ask

What is ghost mannequin photography in simple terms?

Ghost mannequin photography photographs a garment on a mannequin, then digitally removes the mannequin in Photoshop. The final image shows the clothing keeping its shape and inner detail as if worn by an invisible figure.

Is ghost mannequin allowed on Amazon?

Amazon requires main images for adult apparel to be photographed on a live model. Ghost mannequin composites — where the mannequin is fully erased — are permitted as secondary off-figure product images. Visible mannequins and hangers are prohibited across all apparel product images except stockings and socks.

How much does ghost mannequin editing cost per image in 2026?

Manual outsourced editing costs $0.79 – $5.00 per image based on garment complexity and joint type. Full shoot-plus-edit packages run $25 – $120 per image. AI ghost mannequin tools price as low as $0.19 per image, with quality trade-offs on structured garments.

What equipment do I need to shoot ghost mannequin at home?

A removable-panel ghost mannequin, a DSLR or mirrorless camera with a 50mm or 85mm lens, a sturdy tripod, two softboxes at 45°, a seamless white backdrop, and prep tools (steamer, lint roller, pins, tissue paper). Professional magnetic-fit mannequins run $150 – $500.

What is the difference between neck joint, sleeve joint, and bottom joint?

Neck joint rebuilds the inside of a neckline (tees, shirts, sweaters). Sleeve joint reconstructs the inside of open sleeves (jackets, blazers, coats). Bottom joint recreates the interior of open hems (drop-hem dresses, tunics). Complex garments combine all three.

Can AI replace manual ghost mannequin editing?

Not for structured or premium garments. AI handles simple tees and basic tops well but struggles with technical construction, precise drape, and interior detail on jackets, coats, and tailored pieces. Most 2026 studios run a hybrid: AI for volume basics, humans for hero shots and complex garments.

How long does ghost mannequin editing take per garment?

A simple neck joint takes 15–20 minutes for a skilled editor. Complex garments with multiple joints (blazers, coats, dresses) run 45–60 minutes. Outsourced studios deliver in 6–24 hours depending on volume and revision policy.

Does image resolution need to be 72 DPI for web?

No. Pixel dimensions are the only measurement that matters for web display. The PPI/DPI value stored in the file has zero effect on how the image renders in a browser. Focus on width, height, file size, and sRGB color profile when exporting for e-commerce.


Final Thoughts

Ghost mannequin photography is not glamorous. It is operational. The technique exists because structured apparel does not sell on a hanger and cannot afford live models at catalog scale. Master the workflow — prep, four-shot capture, ten-step composite, symmetry pass — and every seasonal drop becomes marketplace-ready at a fraction of on-model cost.

For catalogs under 50 SKUs per season, in-house Photoshop compositing pays for itself. Beyond that, outsource the editing and keep the shoot in-house. AI tools are worth the free trial on your simplest basics but do not trust them yet for structured pieces or premium price tiers.

Either way, treat ghost mannequin as revenue infrastructure. Every product detail page it powers is quietly selling on its own — and the studios that master it in 2026 are the ones shipping thousands of SKUs a season without their photography budget swallowing their margin.

Ready to ship marketplace-ready apparel images at scale? Try Photofixal’s clipping path service risk-free and see the quality difference in your first order.