
Photo Editing Tips for Stunning Images
In the vibrant world of photography, taking a compelling shot is just the beginning of the journey. The true magic often unfolds in the editing room, where you can transform a good photo into a stunning masterpiece. Whether you’re a professional photographer, a retailer showcasing products, or an e-commerce entrepreneur aiming to attract customers, mastering the art of photo editing is crucial for success. This blog will explore the 10 best photo editing tips for stunning images that will elevate your images and help you stand out in a competitive landscape.

1. Photo Editing Tips for Capturing High-Resolution Photos
Importance of Quality
The foundation of great photo editing lies in the quality of the original image. High-resolution images provide more data and detail, allowing for greater flexibility during the editing process.
- Use High-Resolution Photos: Always shoot in the highest resolution possible. This ensures that when you crop, resize, or make adjustments, the image retains its clarity and sharpness.
- Natural Lighting: Shooting in natural light can significantly enhance the quality of your photos. Soft, diffused light (like during golden hour) can bring out the colors and details in your subject, making the editing process easier and more effective.
Tips for Capturing Quality
- Stabilize Your Camera: Use a tripod to minimize blurriness caused by camera shake.
- Experiment with Angles: Take multiple shots from different angles to find the most flattering perspective for your subject.
- Mind the Background: A clean background can make a significant difference in your final image. Avoid distractions that may take away from your subject.
2. Essential Photo Editing Tips for Selecting the Best Software

Software Options
Selecting the right editing software is a critical step in your editing journey. Different software offers various tools and features that can cater to your specific needs.
- Adobe Photoshop: Known for its powerful editing capabilities, Photoshop is ideal for detailed retouching and manipulation.
- Lightroom: Perfect for photographers who need to adjust lighting and color on a large scale, Lightroom is user-friendly and allows batch processing.
- Mobile Apps: For quick edits, consider apps like Snapseed and VSCO. These apps offer a range of filters and editing tools that can be used on the go.
Learning Your Software
- Take Tutorials: Many online platforms offer free or paid tutorials for mastering your chosen software.
- Experiment: Spend time experimenting with different features and tools to understand their functions and how they can enhance your images.
3. Photo Editing Tips for Effective Cropping and Straightening
Enhancing Composition

Cropping and straightening are fundamental techniques that can drastically improve the composition of your images.
- Crop for Impact: Use cropping to focus on the most important parts of your image. Eliminating unnecessary elements can help direct the viewer’s attention where you want it.
- Rule of Thirds: Consider applying the rule of thirds while cropping. This principle suggests dividing your image into thirds both horizontally and vertically, placing your subject along these lines or at their intersections for a more balanced composition.
Straightening Your Image
- Align Horizon Lines: Ensure that your horizon lines are straight to avoid a tilted appearance, which can be distracting for viewers.
4. Enhance Your Photos with Exposure and Contrast Editing Tips

Balancing Lighting
Exposure and contrast adjustments can dramatically alter the mood and feel of your images.
- Adjust Exposure: Use the exposure tool to brighten or darken your image. A well-exposed image will have details in both highlights and shadows.
- Use Contrast Effectively: Increase contrast to make the light areas lighter and the dark areas darker. This adds depth to your images and can make them pop.
Understanding the Histogram
- Reading the Histogram: Learn to read the histogram in your editing software. A well-distributed histogram indicates a balanced exposure, while a histogram that is skewed to one side may signify overexposure or underexposure.
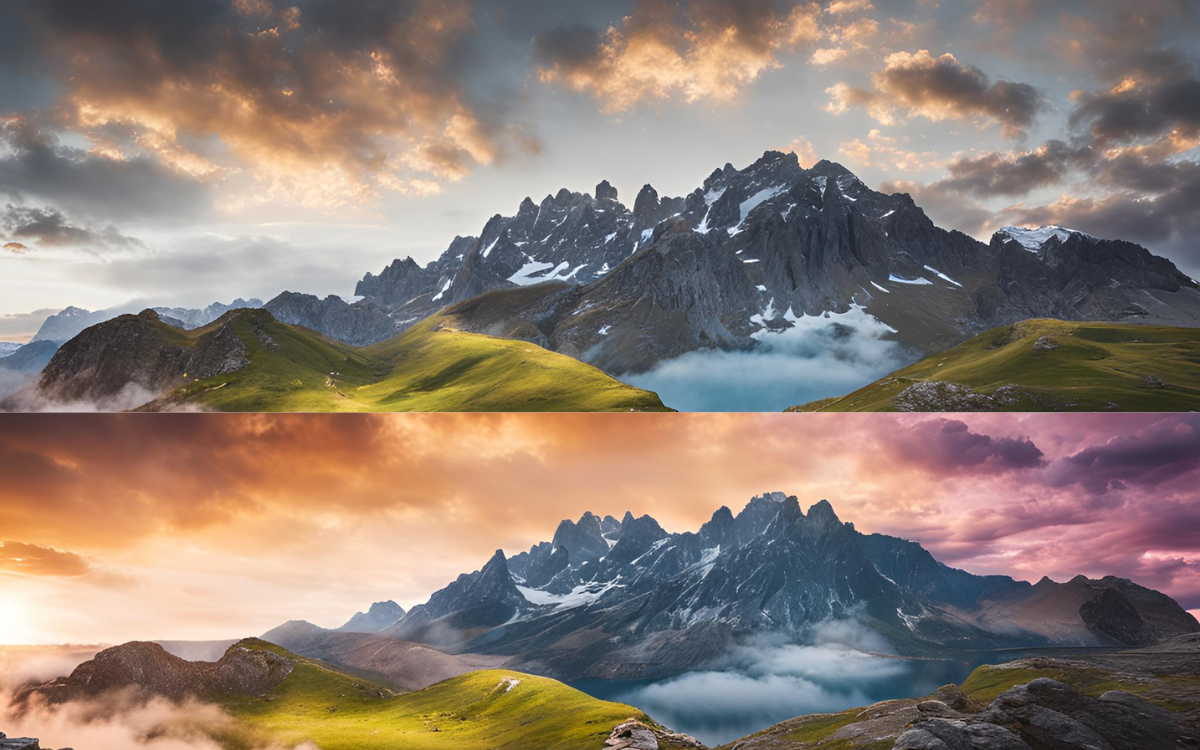
5. Photo Editing Tips for Perfect Color Correction

Achieving Natural Colors
Color correction is essential for making your images look realistic and vibrant.
- White Balance Adjustment: Adjust the white balance to remove any color casts in your image. This is especially important in product photography, where accurate color representation is crucial.
- Saturation vs. Vibrance: Use saturation to enhance all colors equally, while vibrance selectively boosts the muted colors, preserving the natural appearance of skin tones.
Creative Color Grading
- Experiment with Color Grading: Color grading can change the mood of your image entirely. Consider using warmer tones for a cozy feel or cooler tones for a more modern, sleek appearance.
6. Sharpening Tips to Enhance Photo Details

Enhancing Details
Sharpening is a technique used to enhance the details in your images, making them appear crisper and clearer.
- Use Sharpening Tools: Most editing software includes sharpening tools that can enhance the edges in your images. Apply it judiciously to avoid creating an unnatural look.
- Avoid Over-sharpening: Be cautious with sharpening; overdoing it can result in artifacts that degrade image quality.
Selective Sharpening
- Sharpen Key Areas: Use selective sharpening to focus on important areas of your image, such as the eyes in a portrait or the details of a product.
7. Time-Saving Photo Editing Tips with Filters and Presets
Time-Saving Techniques
Filters and presets can significantly speed up your editing process while providing a consistent look across your images.
- Explore Available Options: Most editing software comes with built-in filters and presets. Explore these to see how they can enhance your images.
- Create Your Presets: Once you find a style you like, create your custom presets for future use. This can save a lot of time, especially when editing batches of images.
Customization
- Adjust Presets: While presets can be a great starting point, always customize them to fit the specific image. This ensures that your final result is unique and tailored.
8. Photo Editing Tips for Effective Retouching and Spot Healing

Perfecting Your Images
Retouching allows you to remove imperfections and distractions from your images, resulting in a polished final product.
- Remove Blemishes: Use the healing brush or clone stamp tools to eliminate blemishes, dust spots, or unwanted objects from your images.
- Smooth Skin: For portraits, consider using skin-smoothing techniques, but avoid overdoing it to maintain a natural appearance.
Advanced Retouching Techniques
- Dodge and Burn: This technique involves selectively lightening (dodging) or darkening (burning) specific areas of the image to add depth and dimension.
9. How to Use Vignetting: Photo Editing Tips for Depth and Focus
Creating Focus
Vignetting is a technique where the corners of an image are darkened to draw attention to the center.
- Subtle Vignetting: Apply a subtle vignette to help guide the viewer’s eye towards the focal point of your image. This technique can be particularly effective in portraits and product photography.
- Avoid Heavy Vignetting: Too much vignetting can make the image look artificial. Aim for a gentle touch that enhances rather than detracts.
10. Photo Editing Tips for Choosing the Best File Formats

Choosing the Best Formats
Saving your images in the right format is crucial for maintaining quality and ensuring compatibility with different platforms.
- JPEG for Web Use: JPEG is ideal for web use due to its balance between quality and file size. However, it is a lossy format, so avoid saving multiple copies.
- PNG for Transparency: If your image requires a transparent background, save it as a PNG. This format maintains high quality and is perfect for logos and graphics.
Keeping Original Files
- Backup Originals: Always keep a copy of the original image before editing. This gives you the flexibility to revert to the original if necessary.
Conclusion
Mastering the art of photo editing is essential for anyone involved in photography, retail, or e-commerce. By following these 10 best photo editing tips, you can transform your images from ordinary to stunning, captivating your audience and enhancing your brand. In addition to these tips, exploring advanced photo editing techniques can further elevate your skills. Check out Adobe’s Photoshop Tutorials for in-depth guides on mastering professional editing tools.

Final Thoughts
By applying these best photo editing tips for stunning images, you’ll not only improve the quality of your images but also create a more professional and appealing presentation for your audience. Happy editing!
Leave a Reply